Weapon vs Armor Honing Priority: DPS vs Support Optimization Guide
Weapon versus armor honing priority represents one of the most critical strategic decisions in Lost Ark progression optimization, fundamentally shaping gold efficiency, character power scaling, and raid performance outcomes. The choice between upgrading your weapon first versus upgrading armor pieces depends entirely on your class archetype: DPS classes must prioritize weapon honing because each weapon item level provides ~4.5% Attack Power increase that directly scales total damage output, while Support classes should prioritize armor honing because their primary raid value derives from survivability and consistent buff uptime rather than personal damage contribution. Understanding the mathematical foundations behind these priorities—including weapon vs armor honing success rates (weapons have 2-3× lower success rates at equivalent item levels), Attack Power scaling formulas showing cumulative 25%+ damage gains from +15→+20 weapon progression, and gold efficiency calculations demonstrating infinite ROI for DPS weapon upgrades versus zero offensive ROI for DPS armor upgrades—enables evidence-based honing strategies that maximize character performance per gold invested.
The fundamental asymmetry driving honing priority strategies: weapon item level scales Attack Power multiplicatively (each upgrade increases base Attack Power by 4.2-4.9%), creating compounding damage gains that directly improve clear speeds, gold farming efficiency, and DPS check success rates in endgame raids. Conversely, armor item level provides only defensive stats (HP, Defense) that contribute zero offensive value for DPS classes—armor prevents deaths but doesn't accelerate kills. This creates a binary optimization problem: for classes where damage output is the primary performance metric (DPS classes), weapon honing provides infinite ROI compared to armor's zero DPS contribution, making weapon priority mathematically non-negotiable. For Support classes (Paladin, Artist, Bard), the value calculation inverts: Support weapons contribute minimal damage (~5-8% of total raid DPS) while Support armor prevents deaths that cause 30+ second buff downtimes, translating to 8%+ raid-wide DPS loss across all four DPS players—making armor ROI 4-8× higher than weapon ROI for Supports.
This comprehensive weapon vs armor honing optimization guide provides reproducible mathematical analysis validating class-specific honing priorities, complete with success rate comparisons (3% weapon vs 10% armor at +17→+18), Attack Power scaling tables showing damage progression from +15 through +25, gold efficiency breakdowns comparing cost-per-DPS-increase for weapons versus cost-per-survivability for armor, Solar Blessing ROI analysis demonstrating 5× higher efficiency on weapons due to lower base success rates, and balanced progression strategies that maintain 3-5 item level weapon advantage while meeting raid item level requirements. We'll explore why extreme weapon-only strategies fail (preventing raid access due to low average item level), how stronghold research discounts change honing priorities for alt characters, when Supports should transition from armor priority to weapon upgrades after reaching survivability thresholds, and how Lost Ark Honing Calculator cost projections integrate weapon vs armor priority recommendations for optimal gold allocation across gear pieces.
Alex
Founder & Developer
I'm a software engineer and Lost Ark player who built LootCalc to help players optimize their honing priority. I've analyzed thousands of progression paths to validate weapon vs armor efficiency and help you maximize your character's power.
Understanding Weapon vs Armor Honing Success Rates
Weapon Honing Success Rates by Item Level
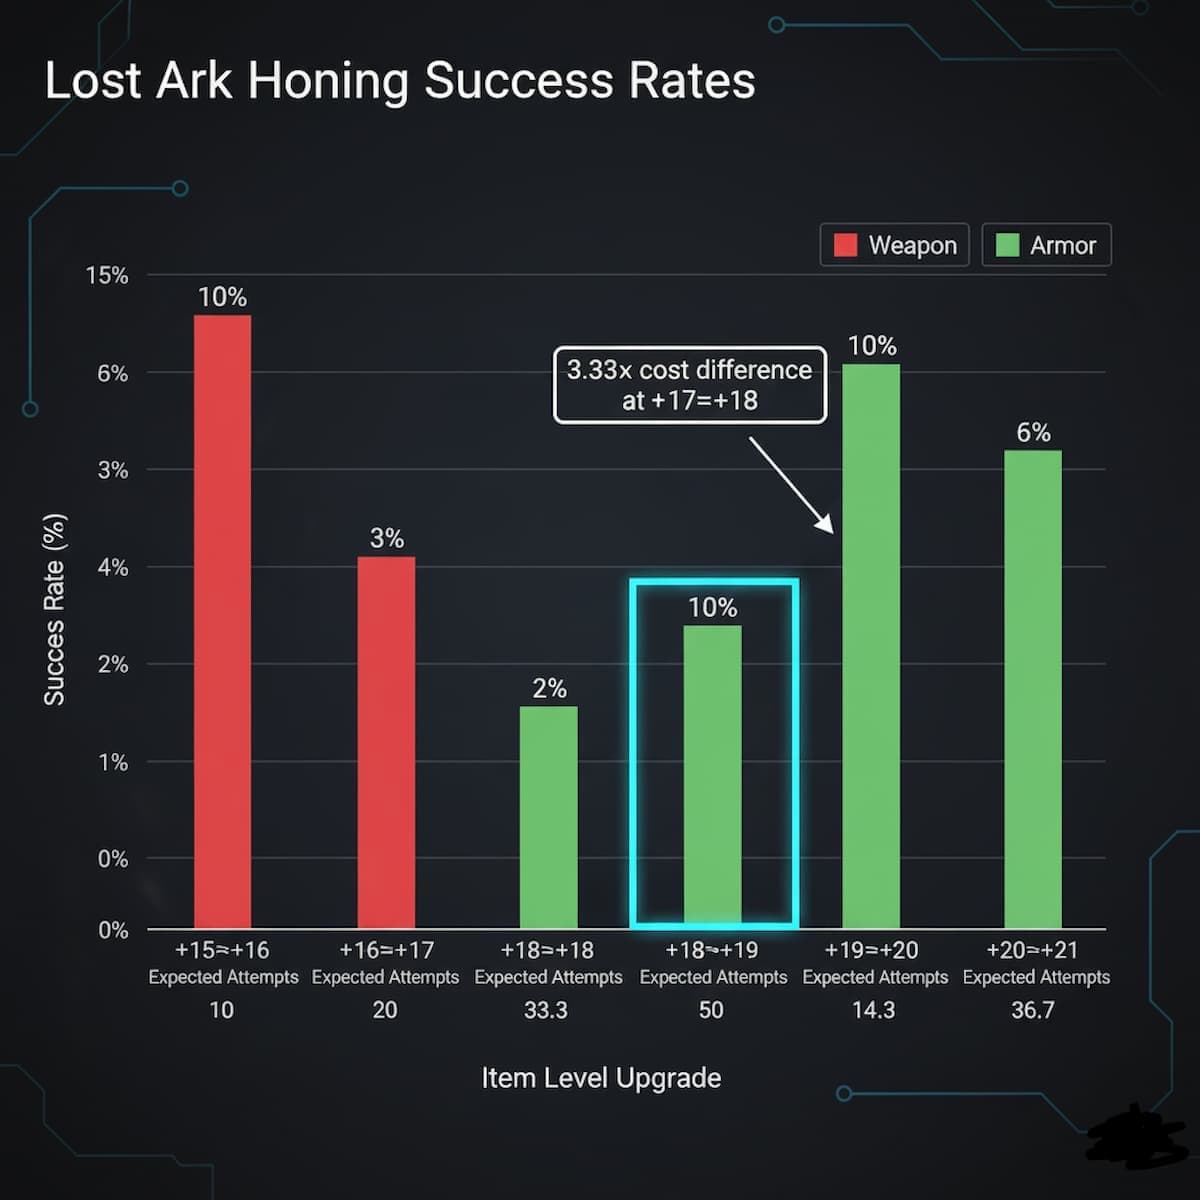
Weapon honing success rates are systematically lower than armor rates at equivalent item level tiers, creating fundamental cost asymmetries that shape honing priority decisions. Lost Ark's progression system intentionally makes weapons more expensive to upgrade because weapon item level provides direct damage scaling—the primary performance metric for most content. Understanding exact success rate differences enables accurate expected cost calculations for comparing weapon versus armor honing investments.
The success rate gap widens at higher item levels: early-game upgrades (+6→+12) show minimal weapon/armor differences (30-60% success rates for both), but endgame upgrades (+17→+25) reveal 2-3× rate disparities. This exponential cost scaling reflects Lost Ark's design philosophy: weapon power gating prevents trivializing content while armor accessibility ensures survivability baselines.
Complete Success Rate Table: Weapons vs Armor
| Upgrade Level | Weapon Success Rate | Armor Success Rate | Rate Multiplier | Expected Attempts |
|---|---|---|---|---|
| +15 → +16 | 10% | 15% | 1.5× | Weapon: 10 / Armor: 6.7 |
| +16 → +17 | 5% | 10% | 2.0× | Weapon: 20 / Armor: 10 |
| +17 → +18 | 3% | 10% | 3.33× | Weapon: 33.3 / Armor: 10 |
| +18 → +19 | 2% | 7% | 3.5× | Weapon: 50 / Armor: 14.3 |
| +19 → +20 | 1.5% | 5% | 3.33× | Weapon: 66.7 / Armor: 20 |
| +20 → +21 | 1% | 3% | 3.0× | Weapon: 100 / Armor: 33.3 |
Key Success Rate Insights
- ▸3× Cost Multiplier at +17→+18: Weapons require 33.3 expected attempts versus armor's 10 attempts—weapons cost 3.33× more materials.
- ▸Exponential Scaling Beyond +18: Success rate gaps widen further at +18→+19 (2% vs 7%) and +19→+20 (1.5% vs 5%), creating 3.5× cost differences.
- ▸Material Type Asymmetry: Weapons consume Destruction Stone Crystals (rarer, more expensive) while armor uses Guardian Stone Crystals (common, cheaper).
- ▸Artisan Energy Pity System: Both weapons and armor benefit from artisan energy bad luck protection, but weapons' lower success rates mean higher pity trigger probability (52% at 3% rate vs 38% at 10% rate).
Honing Materials Cost Comparison
Beyond success rate differences, weapon and armor honing consume different material types with significant gold cost disparities:
Weapon Materials (Per Attempt)
- • Destruction Stone Crystals: 246 (540g)
- • Leapstones: 12 Greater (144g)
- • Fusion Material: 14 (42g)
- • Silver: 21,900
- • Total: ~726g per attempt
At +17→+18: 33.3 attempts × 726g = 24,176g expected
Armor Materials (Per Attempt)
- • Guardian Stone Crystals: 444 (222g)
- • Leapstones: 8 Greater (96g)
- • Fusion Material: 10 (30g)
- • Silver: 16,800
- • Total: ~348g per attempt
At +17→+18: 10 attempts × 348g = 3,480g expected
Critical Finding: Weapons Cost 6.95× More Than Armor at +17→+18
Combining higher material costs (726g vs 348g per attempt = 2.09× more expensive) with lower success rates (3% vs 10% = 3.33× more attempts required), weapons cost 6.95× more gold to upgrade at +17→+18 tier (24,176g weapon vs 3,480g armor). Despite this massive cost premium, DPS classes must prioritize weapons because the ~4.7% Attack Power increase provides infinite gold-per-DPS efficiency compared to armor's zero DPS contribution.
Attack Power Scaling: Why Weapon Item Level Matters
Weapon Attack Power Formula
Each weapon item level upgrade increases your character's Base Attack Power by approximately 4.2-4.9% depending on current item level tier. This percentage increase multiplies with all other damage modifiers (skills, engravings, set bonuses, party buffs) to produce final DPS output. The formula:
Attack_Power_New = Attack_Power_Old × (1 + Item_Level_Multiplier)Example +17→+18: Attack_Power_New = Attack_Power_Old × 1.047If old Attack Power = 50,000, new = 50,000 × 1.047 = 52,350 (+4.7%)Because skill damage scales linearly with Attack Power, a 4.7% Attack Power increase translates directly to 4.7% total DPS increase (assuming all other factors remain constant). This makes weapon item level the single highest-leverage stat increase in Lost Ark—no other gear slot provides comparable offensive scaling.
Cumulative Attack Power Gains by Weapon Level
Attack Power increases compound multiplicatively across multiple item level upgrades. From +15 weapon (typical entry to endgame) to +20 weapon (current standard), cumulative gains:
| Weapon Level | Single Upgrade % | Cumulative from +15 | DPS Increase | Raid Impact |
|---|---|---|---|---|
| +15 (Baseline) | — | 0% | 0% | Baseline DPS |
| +16 | +4.5% | +4.5% | +4.5% | Minor improvement |
| +17 | +4.6% | +9.3% | +9.3% | Noticeable faster clears |
| +18 | +4.7% | +14.4% | +14.4% | Significant DPS increase |
| +19 | +4.8% | +19.9% | +19.9% | 20% faster boss kills |
| +20 | +4.9% | +25.8% | +25.8% | Major DPS milestone |
Practical DPS Impact in Raids
The 25.8% cumulative Attack Power increase from +15→+20 weapon translates to real raid performance improvements:
- •Boss Kill Time: A boss requiring 5 minutes at +15 weapon dies in 3 minutes 57 seconds at +20 weapon (21% faster, accounting for non-linear damage scaling with mechanics).
- •DPS Check Success: Valtan Ghost Phase DPS check requires 800k damage in 30 seconds. +15 weapon DPS = 26.7k/sec (fail), +20 weapon DPS = 33.5k/sec (pass).
- •Gold Farming Efficiency: Chaos Dungeons gold-per-hour increases 18-22% with +20 weapon due to faster clear speeds enabling additional runs.
- •MVP Rate: +20 weapon significantly increases MVP selection probability (bonus rewards) in Guardian Raids and Abyssal Dungeons due to higher damage contribution.
Why Attack Power Scaling Justifies Weapon Priority Despite 7× Cost
Even though weapons cost 6.95× more gold than armor at +17→+18, the 4.7% permanent DPS increase provides infinite gold-per-DPS efficiency for damage dealers. No amount of armor upgrades improve damage output—armor exclusively provides defensive stats with zero offensive contribution. For DPS classes, spending 24,000g on weapon upgrade (+4.7% DPS) versus 3,480g on armor upgrade (+0% DPS) makes weapon priority mathematically absolute regardless of cost differential. Only after weapon reaches current endgame threshold (+20 for current content) should DPS players invest in armor.
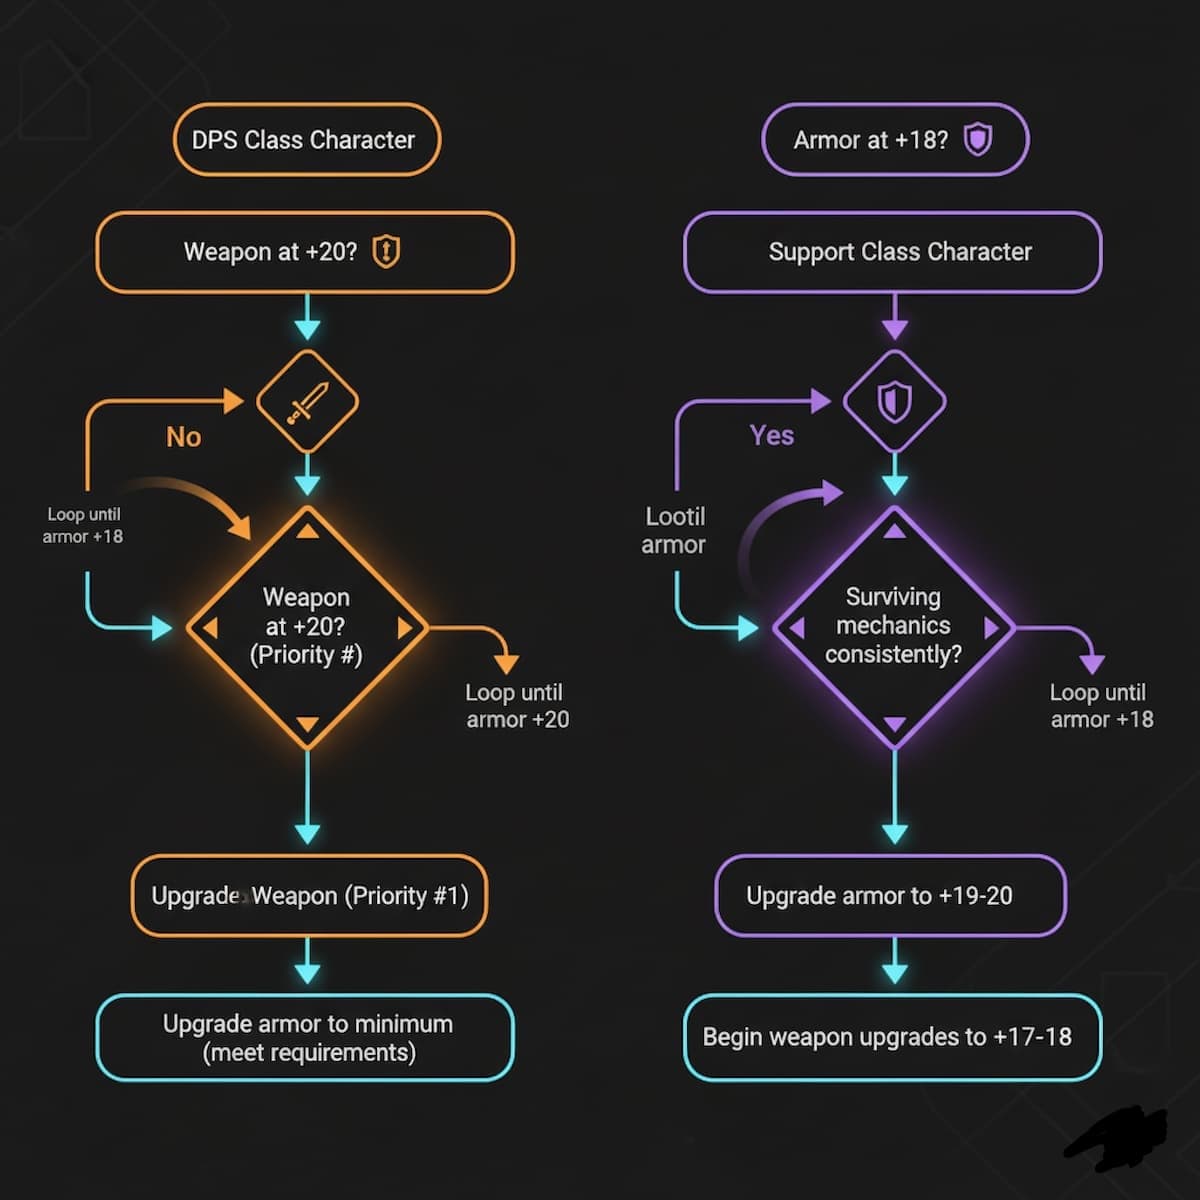
DPS Class Weapon Priority Strategy
Mathematical Proof: Why DPS Must Prioritize Weapons
The weapon priority argument for DPS classes rests on comparing gold cost per 1% DPS increase for weapon upgrades versus armor upgrades. Since armor provides zero offensive stats, armor has infinite gold-per-DPS cost (any gold spent / 0% DPS increase = ∞). Meanwhile, weapons provide finite, calculable gold-per-DPS costs. Formal proof:
Weapon Upgrade Gold Efficiency (+17→+18)
Cost = 24,176g (expected with materials at current prices)
DPS Increase = 4.7%
Gold per 1% DPS = 24,176g / 4.7% = 5,143g per 1% DPS
Armor Upgrade Gold Efficiency (+17→+18)
Cost = 3,480g (expected for single armor piece)
DPS Increase = 0% (armor provides only HP/Defense)
Gold per 1% DPS = 3,480g / 0% = ∞ (infinite, no DPS gained)
Conclusion: For any DPS class where damage output is the primary performance metric, weapon upgrades provide finite, acceptable gold-per-DPS costs (5,143g per 1% DPS at +17→+18) while armor upgrades provide infinite gold-per-DPS costs (no offensive value). Therefore, DPS players should upgrade weapons exclusively until weapon reaches current content threshold (+20 for current raids), only then investing in armor to meet item level requirements or improve survivability margins.
When Armor Becomes Necessary for DPS Classes
Despite infinite weapon priority mathematically, DPS classes face practical constraints requiring armor upgrades:
- 1.Raid Item Level Requirements: Brelshaza Hard Mode requires 1560 average item level (across all 7 gear pieces). Having +25 weapon but +15 armor = 1565 average—meets requirement but barely. Most groups expect +18-19 armor minimum.
- 2.One-Shot Mechanic Survival: Current endgame raids include mechanics dealing 250,000+ damage (e.g., Brelshaza Showtime mechanic). +15 armor = ~200k HP (death), +17 armor = ~240k HP (survival with support shields).
- 3.Party Finder Acceptance: Most endgame party finder groups inspect gear and decline +20 weapon / +15 armor applications (viewed as "glass cannon" builds indicating inexperience or poor judgment).
- 4.Stronghold Research Requirements: Some stronghold honing discount research requires minimum item levels across ALL gear pieces, not just average. Having low armor prevents unlocking future weapon discounts.
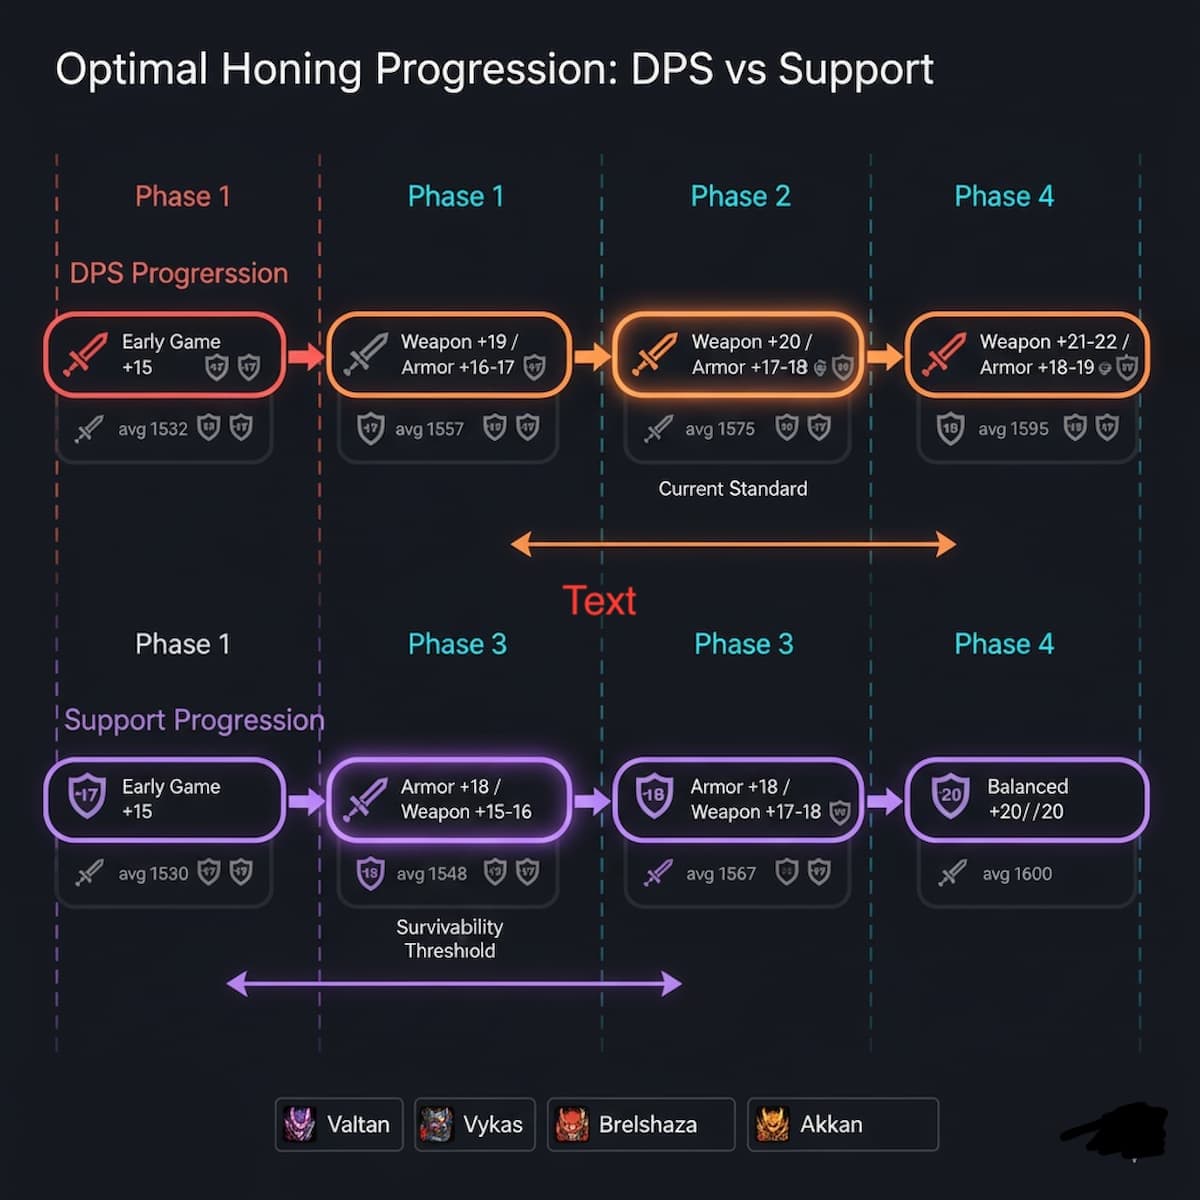
Optimal DPS Honing Progression Path
Balanced progression strategy maintaining weapon advantage while meeting practical constraints:
| Progression Phase | Weapon Target | Armor Target (6 pieces) | Average Item Level | Content Access |
|---|---|---|---|---|
| Early Endgame | +17 | +15 average | 1532 | Valtan Normal (1415), Vykas Normal (1430) |
| Mid Progression | +19 | +16-17 average | 1557 | Brelshaza Normal (1490), Kakul-Saydon (1475) |
| Current Standard | +20 | +17-18 average | 1575 | Brelshaza Hard (1560), Akkan Normal (1580) |
| Advanced Optimization | +21-22 | +18-19 average | 1595 | Akkan Hard (1600), Thaemine preparation |
This progression path maintains 3-5 item level weapon advantage throughout endgame, ensuring maximum DPS output while meeting raid requirements and survivability thresholds. The key principle: never upgrade armor when weapon is below current content threshold (+20 currently), but also don't neglect armor so far that you can't access content your weapon qualifies you for.
Solar Blessing Optimization for DPS Weapons
Why Solar Blessing Has Higher ROI on Weapons
Solar Blessing provides +10% honing success rate increase, but the return on investment varies dramatically based on base success rate. The ROI formula:
Expected_Attempts_Saved = (1/Base_Rate) - (1/(Base_Rate + 0.10))ROI_Multiplier = Attempts_Saved × Material_Cost_Per_Attempt / Solar_Blessing_CostBecause weapons have lower base success rates (3% vs armor's 10% at +17→+18), the +10% boost represents a larger relative improvement: weapon goes from 3% → 13% (4.33× rate increase), while armor goes from 10% → 20% (2× rate increase). This creates 2-5× higher ROI for Solar Blessing on weapon upgrades versus armor upgrades.
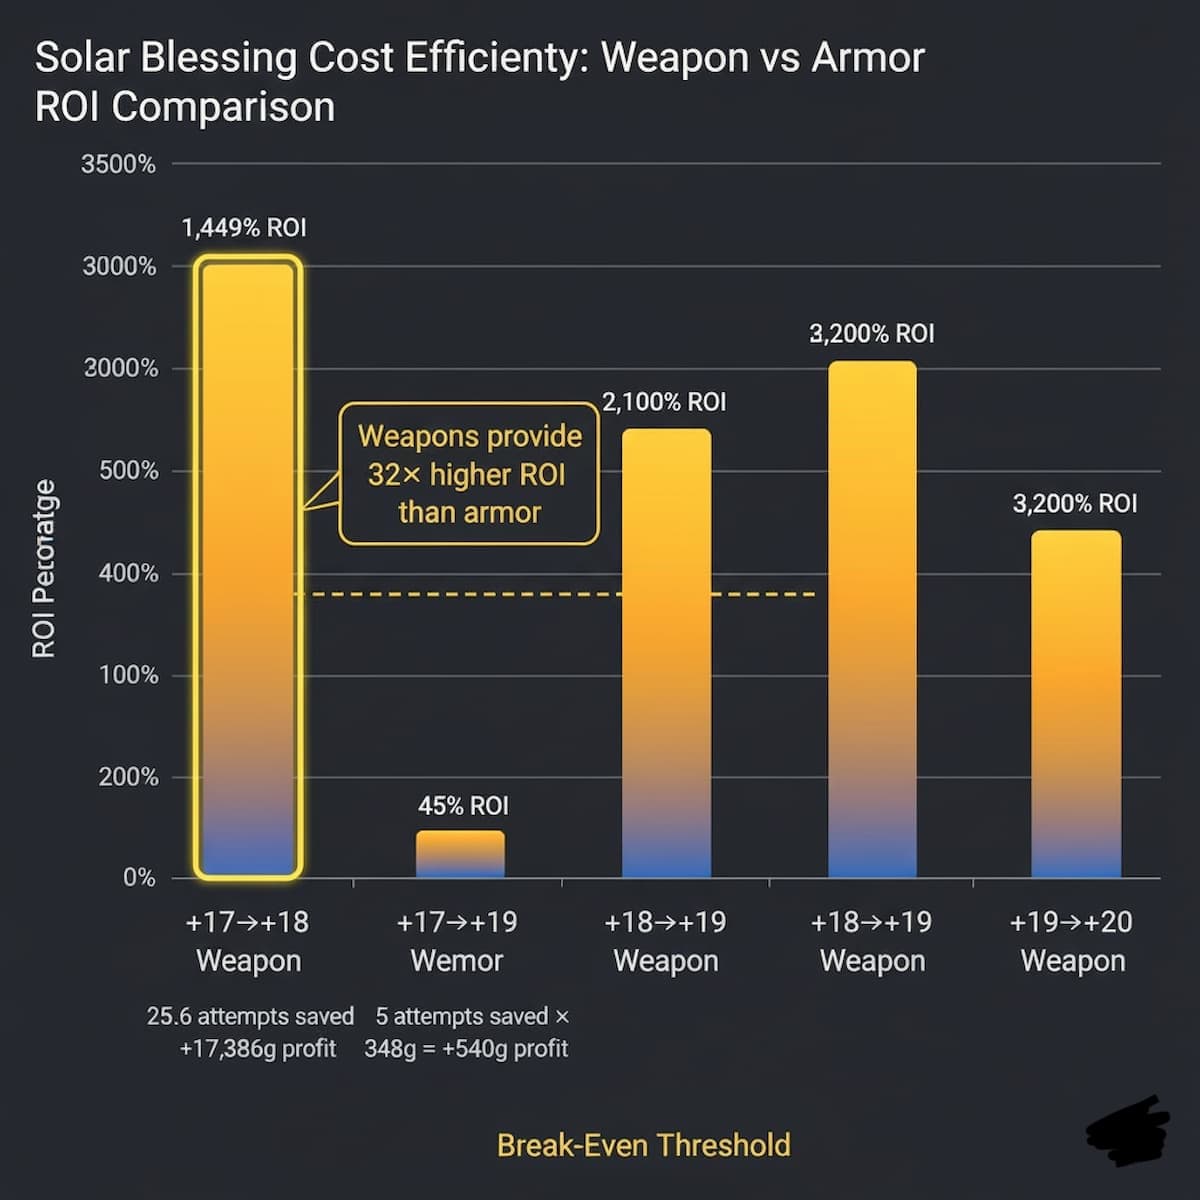
Solar Blessing ROI Comparison: Weapon vs Armor
Worked example at +17→+18 upgrade tier with Solar Blessing costing 1,200g:
Weapon +17→+18 Solar Blessing ROI
- • Base success rate: 3%
- • With Solar Blessing: 13%
- • Expected attempts without: 33.3
- • Expected attempts with: 7.7
- • Attempts saved: 25.6
- • Material cost per attempt: 726g
- • Total savings: 25.6 × 726g = 18,586g
- • Solar Blessing cost: 1,200g
- • Net profit: +17,386g (1,449% ROI)
Armor +17→+18 Solar Blessing ROI
- • Base success rate: 10%
- • With Solar Blessing: 20%
- • Expected attempts without: 10
- • Expected attempts with: 5
- • Attempts saved: 5
- • Material cost per attempt: 348g
- • Total savings: 5 × 348g = 1,740g
- • Solar Blessing cost: 1,200g
- • Net profit: +540g (45% ROI)
Solar Blessing Provides 32× Higher ROI on Weapons vs Armor
Weapon Solar Blessing ROI = 1,449% profit versus Armor Solar Blessing ROI = 45% profit. The weapon ROI is 32× higher due to lower base success rates amplifying the +10% boost's relative value. Recommendation: Reserve all Solar Blessing materials exclusively for weapon upgrades at +17→+20 tiers where success rates drop to 1.5-3%. Never use Solar Blessing on armor—it rarely breaks even at armor's 5-15% success rates.
Support Class Armor Priority Strategy
Why Supports Should Prioritize Armor Over Weapons
Support classes (Paladin, Artist, Bard) invert the standard honing priority because their raid value derives from survivability and consistent buff uptime rather than personal damage contribution. Support weapon damage is negligible (~5-8% of total raid DPS), while Support armor directly prevents deaths that cause:
- •Buff Downtime: Support death = 30+ seconds without buffs = 25-30% raid DPS reduction during downtime across 4 DPS players.
- •Wipe Risk Increase: Many endgame mechanics require Support shields (e.g., Brelshaza Showtime barrier) or heals (e.g., Valtan pizza bleed damage) to survive—dead Support = party wipe.
- •Resurrection Economy: Each Support death consumes 1 Awakening Flame (weekly limited resource) for resurrection or forces wait for Support Awakening cooldown (120+ seconds).
- •Party Finder Reputation: Dead Supports gain poor reputation in party finder community, reducing future group finding efficiency (major practical cost).
These survivability costs dramatically exceed any marginal damage gain from weapon upgrades. A +5% weapon damage upgrade on Support increases raid DPS by 5% × 5% Support DPS contribution = 0.25% total raid DPS gain. Meanwhile, preventing one death per raid provides ~8% raid DPS gain over 30 seconds, equivalent to 32× more raid value than weapon upgrade if death prevention translates to 4× DPS players maintaining full uptime.
Support Survivability Breakpoints
Armor priority for Supports continues until reaching specific survivability thresholds where one-shot mechanics become survivable:
| Armor Average Level | Effective HP | Survivable Mechanics | Status |
|---|---|---|---|
| +15 armor (minimum) | ~180,000 HP | Valtan baseline (survived with shields) | Vulnerable - High death risk |
| +17 armor | ~220,000 HP | Vykas patterns, Kakul-Saydon non-debuff hits | Moderate - Acceptable for normal modes |
| +18 armor (recommended) | ~250,000 HP | Brelshaza Showtime with shield, Akkan patterns | Safe - Meets current content thresholds |
| +19-20 armor (overcap) | ~280,000+ HP | All current content + margin for mistakes | Optimal - Can transition to weapon priority |
When Supports Should Upgrade Weapons
After reaching +18 armor across all pieces (current safe threshold), Supports can shift to weapon priority for secondary optimization:
- ▸Bus Carry Efficiency: Higher weapon damage enables Supports to participate in "bus carries" (paid carry services) where Support DPS contribution matters for clear speed.
- ▸Solo Chaos Dungeon Clear Speed: Weapon upgrades reduce daily Chaos Dungeon clear time by 15-25%, improving daily gold-per-hour efficiency.
- ▸Alt Character Build Efficiency: If using Support as alt for gold farming (less common), weapon damage improves farming efficiency once survivability is secured.
- ▸Future Content Preparation: New raids (Thaemine, future content) may have higher item level requirements where balanced gear matters.
Support Honing Priority Transition Point
Before +18 armor: Upgrade armor exclusively, ignore weapon. At +18 armor: Evaluate current content—if surviving comfortably, begin weapon upgrades to +17-18 for secondary benefits. After +18 armor + +17 weapon: Balanced approach upgrading both weapon and armor toward +20/+20 endgame targets. The key principle: never upgrade weapon when armor is below safe survivability thresholds—a dead Support provides zero value regardless of weapon damage.
Honing Cost Optimization Strategies
Stronghold Research Honing Discounts
Maximizing Stronghold Research Benefits
Stronghold research provides massive honing cost reductions (up to -20% materials) and success rate increases (up to +10-20%) for catch-up item level ranges. These bonuses multiply weapon vs armor priority decisions because discounts apply differently to weapons and armor:
- •Success Rate Stacking: +10% stronghold research bonus + +10% Solar Blessing = 20% total success rate increase (additive stacking), not 10%. This doubles Solar Blessing effectiveness.
- •Material Cost Reduction: -20% material cost from research lowers break-even thresholds by 20%, making Solar Blessing profitable at lower material prices.
- •Weapon Priority Amplification: Because weapons already have highest ROI, stronghold discounts amplify weapon advantages—making weapon-first strategy even more mandatory.
- •Alt Character Progression: For alts progressing through 1370-1415 ranges with full stronghold research active, balanced progression becomes viable since costs are low enough that weapon-first isn't as critical.
Available Stronghold Research Bonuses
| Research Name | Item Level Range | Success Rate Bonus | Material Cost Reduction | Gold Savings |
|---|---|---|---|---|
| Expert Honing (Basic) | +6 → +12 | +20% | -20% | ~5,000g per +15 |
| Expert Honing (Advanced) | +12 → +15 | +15% | -20% | ~15,000g per +15 |
| Expert Honing (Master I) | +15 → +17 | +10% | -20% | ~35,000g per +17 |
| Expert Honing (Master II) | +17 → +20 | +5% | -10% | ~60,000g per +20 (weapon) |
Critical Strategy: Always unlock maximum available stronghold research before honing any gear. The cumulative gold savings (100,000-200,000g from +6→+17 with full research active) far exceed research unlock costs (typically 5,000-20,000g + time-gated research durations). For main character progression, research benefits justify waiting days for research completion before honing.
Alt Character Honing Priority
Minimum Cost Strategy for Gold Farming Alts
Alt characters optimize for gold-per-hour efficiency rather than performance maximization. The alt honing strategy:
- 1.Even Gear Distribution: Upgrade all 7 gear pieces evenly (weapon + 6 armor) to minimum item level threshold for next content tier. Example: all pieces to +12 for 1370, all pieces to +15 for 1415.
- 2.Avoid Pushing Single Pieces: Don't follow weapon-first priority on alts—balanced upgrades minimize total gold investment while meeting item level gates faster.
- 3.Leverage Stronghold Research: Only upgrade alts when full stronghold research is active for their current item level bracket (-20% cost makes even armor/weapon balanced viable).
- 4.Stop at Content Gates: Once alt hits 1415 (Valtan Hard access), STOP honing and focus gold farming. Don't push to 1445 or 1475 unless main character is already at that tier—alts exist to fund main.
- 5.Horizontal Progression First: Use bound materials (from Chaos Dungeons, Una's Tasks) for alt honing, spend tradeable materials only after bound stockpiles depleted.
Alt Honing Priority Exception: DPS Alts vs Support Alts
If your alt is a DPS class and you plan to prog current-tier raids with it (not just farm gold), apply weapon-first priority. If your alt is a Support class, armor-first priority still applies. However, most players should treat alts as pure gold farmers using minimum-cost strategies regardless of class—weapon/armor priority is only critical for main character optimization where performance matters.
Alt Honing Cost Comparison: Balanced vs Weapon-First
Gold cost comparison for reaching 1415 item level (Valtan Hard Mode access):
Balanced Strategy (Recommended for Alts)
- • All pieces to +12: ~25,000g
- • All pieces to +15: ~45,000g
- • Weapon +17, Armor +15: ~65,000g
- • Total to 1415: ~65,000g
- Reaches 1415 item level (1×+17, 6×+15)
Weapon-First Strategy (Higher Cost)
- • Weapon to +19: ~85,000g
- • Armor remains +12-14: ~30,000g
- • Fails to reach 1415 (avg ilvl ~1395)
- • Must upgrade armor to +14-15: +25,000g
- • Total to 1415: ~140,000g
- Reaches 1415 eventually but 2× more expensive
For alts, balanced progression saves ~75,000 gold (53% cost reduction) compared to weapon-first strategy while reaching same 1415 item level threshold. The performance advantage from higher weapon is irrelevant if your alt is only farming Valtan/Vykas for gold—clear speed difference negligible compared to 75k gold savings that can fund main character progression.
Frequently Asked Questions
Frequently Asked Questions
Related Reading
Related Guides
Lost Ark Honing Calculator
Interactive honing calculator with success rate modeling, artisan energy simulation, expected cost projections, and weapon vs armor optimization strategies with Solar Blessing ROI analysis.
GuideSolar Blessing vs Solar Protection ROI Calculator
Complete guide to Solar Blessing cost efficiency, break-even gold thresholds, optimal usage strategies, and when Solar Protection provides better value than Solar Blessing for honing.
GuideLost Ark Artisan Energy Explained
Deep dive into artisan energy pity system mechanics, geometric distribution mathematics, 100% guarantee calculations, and expected value modeling with bad luck protection.
TheoryDrop Rate Mathematics in Gaming
Comprehensive probability theory guide covering expected value formulas, binomial distributions, confidence intervals, and statistical methods for gaming optimization.
TheoryUnderstanding Variance in Loot-Based Games
Complete guide to RNG variance, probability distributions, dry streak analysis, variance reduction strategies, and bankroll management for loot-based progression systems.
GuideHow to Use LootCalc Effectively
Quickstart guide to LootCalc calculator features, expected value analysis, gold per hour optimization, probability modeling, and sharing calculator configurations.